Collaborative Chat Architecture
1. Architectural Data Flow
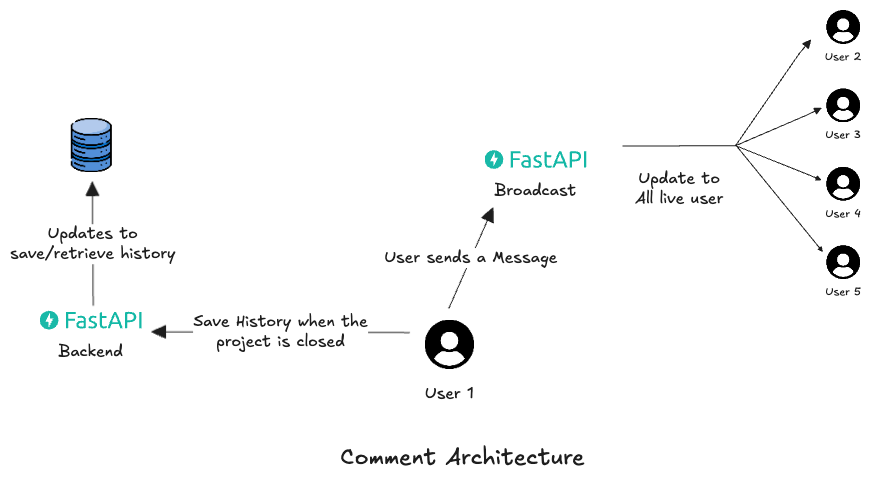
The following diagram illustrates the dual-path architecture used to handle real-time communication alongside data persistence.
Workflow Description
As depicted in the architecture, the system splits the "Message Action" into two distince parallel processes:
1. The Broadcast Path (Real-Time):
- Action: User 1 sends a message via the Chat Window.
- Process: The message is immediately routed to the FastAPI Broadcaster.
- Result: The Broadcaster identifies all other active users (User 2 through User 5) currently connected to the same version_id and pushes the message to their clients via WebSocket. This ensures zero-latency communication.
2. The Persistence Path (History):
- Action: As the message flows through the backend, the system triggers a save operation.
- Process: The FastAPI Backend writes the message payload (Content, Timestamp, Tagged Entities) to the Database.
- Result: This build-up of history allows the system to Retrieve History whenever a new user joins the session or reloads the page, ensuring no context is lost.
2. Backend System Implementation
The backend is responsible for enforcing the scope of the conversation and routing messages efficiently.
A. The Scope: (version_id)
To ensure data isolation, the system uses the Version ID as the unique "Room Key".
- Every WebSocket connection is establishes specifically for one version.
- Users on Version A will never receive messages intended for Version B.
B. The Broadcaster
The core logic resides in a ConnectionManager class that handles the lifecycle of the websockets.

- Endpoint: ws://api.domain.com/ws/chat/{version_id}
- Connection Logic:
- On Connect: The manager accepts the socket and adds it to an in-memory list mapped to the version_id.
- On Receive: When a message arrives, the manager performs an O(1) lookup to find the list of peers for that version.
- On Broadcast: It iterates through the peer list and sends the JSON payload.
- On Disconnect It removes the socket from the list to prevent memory leaks.
C. Data Payload Structure
Instead of sending a plain string like "Check @NodeA", we send a structured array of "blocks". This allows the frontend to render the @NodeA as a clickable, highlighted component.
The Logic
- Text Block: Standard text.
- Mention Block: A special object containing the node_id.
1. Client Payload (Input)
Direction: Frontend -> Backend (WebSocket) When the user types a message and hits send, the Composer component generates this structure.
{
  "type": "SEND_MESSAGE",
  "payload": {
    "thread_id": "thread_v4_uuid",  // Optional: if replying to a thread
    "content": [
      // Block 1: Regular Text
      {
        "type": "text",
        "text": "I think there is an issue with "
      },
      // Block 2: The "Node Tag" (The Mention)
      {
        "type": "mention_node",
        "attrs": {
          "id": "line_plot_01",
          "label": "Line Plot"
        }
      },
      // Block 3: Regular Text
      {
        "type": "text",
        "text": " because the gain is too high."
      }
    ],
    // Metadata for the Backend to quickly index references
    "tagged_entities": ["line_plot_01"]
  }
}
Why this design?
- type: "mention_node": This tells the UI to render a special "Badge" component instead of plain text.
- attrs: Contains the id (for logic) and label (what the user sees, e.g., "Line Plot").
- tagged_entities: A summary array. The backend uses this to quickly save relationships in the DB without parsing the complex content array.
2. Server Broadcast Payload
Direction: Backend -> All Clients (WebSocket)
The server stamps the message with the sender's details and broadcasts it.
{
  "event": "NEW_MESSAGE",
  "data": {
    "id": "msg_uuid_999",
    "timestamp": "2023-11-26T10:15:00Z",
    "sender": {
      "id": "user_alice",
      "name": "Alice",
      "avatar": "https://avatar.url/..."
    },
    // The structured content is passed through exactly as received
    "content": [
      { "type": "text", "text": "I think there is an issue with " },
      { "type": "mention_node", "attrs": { "id": "line_plot_01", "label": "Line Plot" } },
      { "type": "text", "text": " because the gain is too high." }
    ]
  }
}
{
"event": "NEW_MESSAGE",
"data": {
"id": "msg_uuid_999",
"timestamp": "2023-11-26T10:15:00Z",
"sender": {
"id": "user_alice",
"name": "Alice",
"avatar": "https://avatar.url/..."
},
// The structured content is passed through exactly as received
"content": [
{ "type": "text", "text": "I think there is an issue with " },
{ "type": "mention_node", "attrs": { "id": "line_plot_01", "label": "Line Plot" } },
{ "type": "text", "text": " because the gain is too high." }
]
}
}
3. Frontend Implementation Note
To handle this payload similarly to Liveblocks, your frontend implementation will look like this:
A. The Input (Composer)
When the user types @: 1. The Editor detects the trigger character @.
-
Instead of fetching Users, it fetches the List of Nodes and edges in the current Reactflow instance.
-
User selects "Line Plot".
-
The Editor inserts a node with type: 'mention_node'.
B. The Renderer (Message Bubble)
When rendering the message history:
-
Map through the content array.
-
If type === 'text', render a < span >.
-
If type === 'mention_node', render a custom < NodeTag /> component.
Example < NodeTag /> Component logic:
const NodeTag = ({ id, label }) => {
  const { zoomToNode } = useReactFlow();

  return (
    <span
      className="bg-blue-100 text-blue-800 px-1 rounded cursor-pointer hover:bg-blue-200"
      onClick={() => zoomToNode(id)} // Interaction: Clicking tag moves camera to node
      onMouseEnter={() => highlightNode(id)}
    >
      @{label}
    </span>
  );
};
const NodeTag = ({ id, label }) => {
const { zoomToNode } = useReactFlow();
return (
<span
className="bg-blue-100 text-blue-800 px-1 rounded cursor-pointer hover:bg-blue-200"
onClick={() => zoomToNode(id)} // Interaction: Clicking tag moves camera to node
onMouseEnter={() => highlightNode(id)}
>
@{label}
</span>
);
};